Delta Data Services LLC

Zoho CRM Video Tip: Working With Email Templates (Part 2)  – Delta Data Services LLC

Zoho CRM Video Tip: Working With Email Templates (Part 2) 

Delta Data Services

01.11.20 02:14 AM Comment(s)

Zoho CRM Video Tip: Working With Email Templates (Part 2) 

This video blog continues from the previous video blog and is explaining the features of the email template in Zoho CRM. In the first blog we show you where to find the email templates. In this blog we show you more of the features of the email templates. In the following video we describe the rest of the drag and drop features of the email templates in CRM including:

  • IMAGE
  • SPACERS
  • IMAGE and TEXT
  • BUTTONS
  • COLUMNS


Tip: this is part 2 of Zoho CRM Video Tip: Working with Email Templates video blog series.


Click here to go the Zoho CRM Video Tip: Working with Email Templates (Part 1)

Click here to go the Zoho CRM Video Tip: Working with Email Templates (Part 3)

Learn more about Email Templates (Part 2)

Schedule a Free 1-hour session for help with Zoho CRM Email Templates

Please Subscribe

Zoho One Tip: Introduction to Zoho Campaigns

Zoho One Tip: Introduction to Zoho Campaigns

Delta Data Services LLC

08.07.22 04:48 PM Comment(s)

Zoho One Tip: Introduction to Zoho Campaigns

Zoho Campaigns is an email marketing automation product that helps you reach your subscribers with the right message at the right time. You can create beautiful emails in minutes using the pre-designed templates, layouts, and the drag-and-drop editor. Once you sign up to Zoho Campaigns account, you need to add your company and personal information. You can also send invites to other users to create an account with Zoho Campaigns.


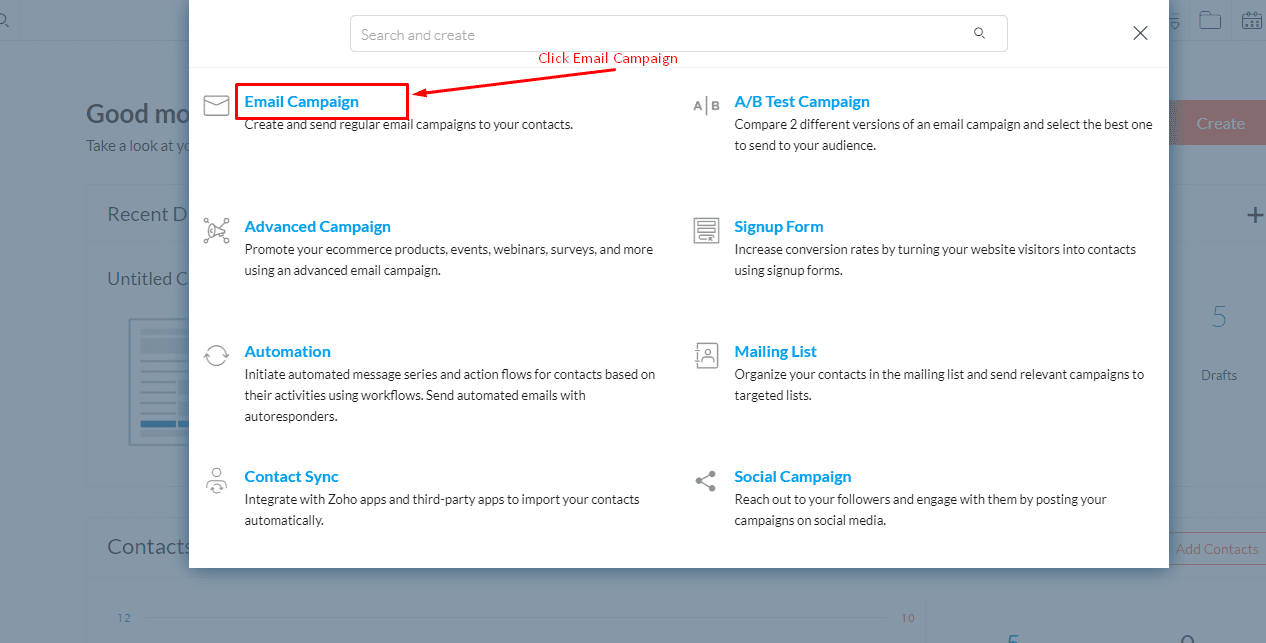
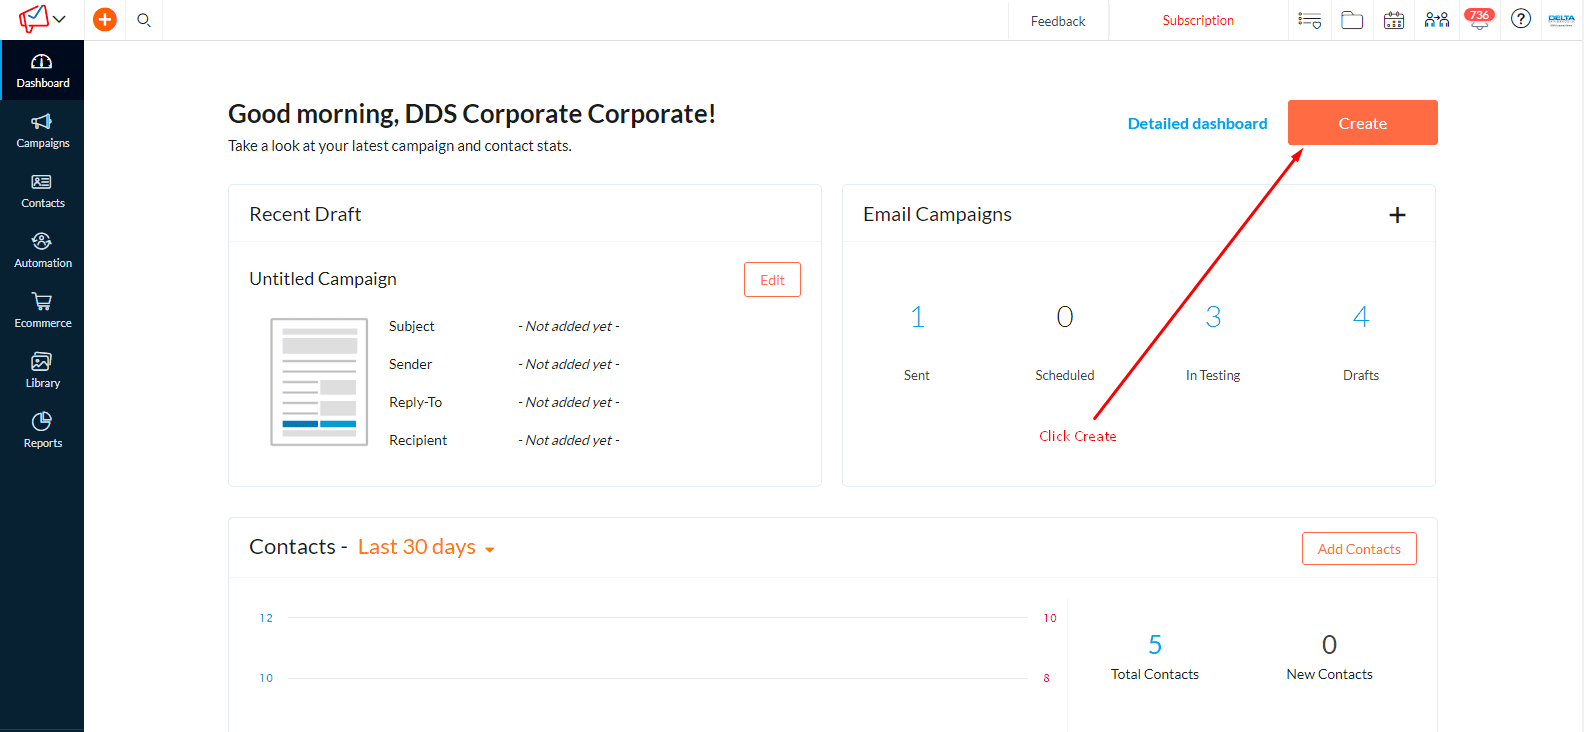
Login to Zoho Campaigns account and Click Create.

Click Email Campaign

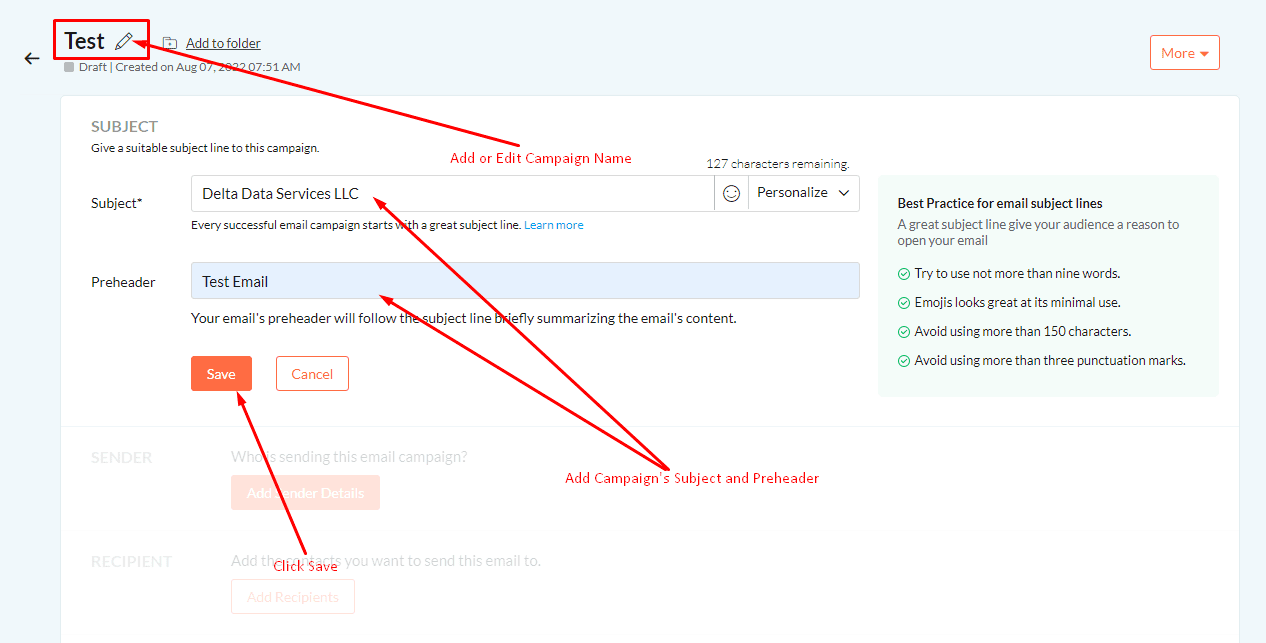
Add Campaign Name, Subject and Preheader. Then Click Save.

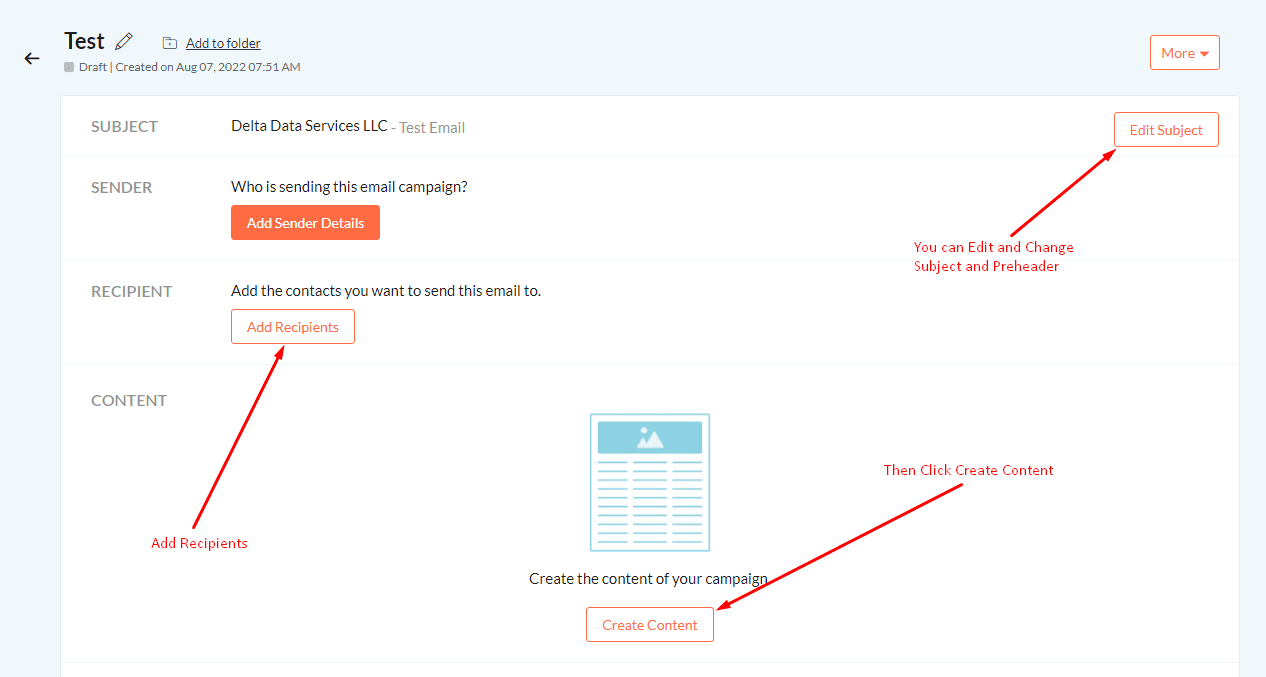
Add Email Recipients and Sender. Then Click Create Content.

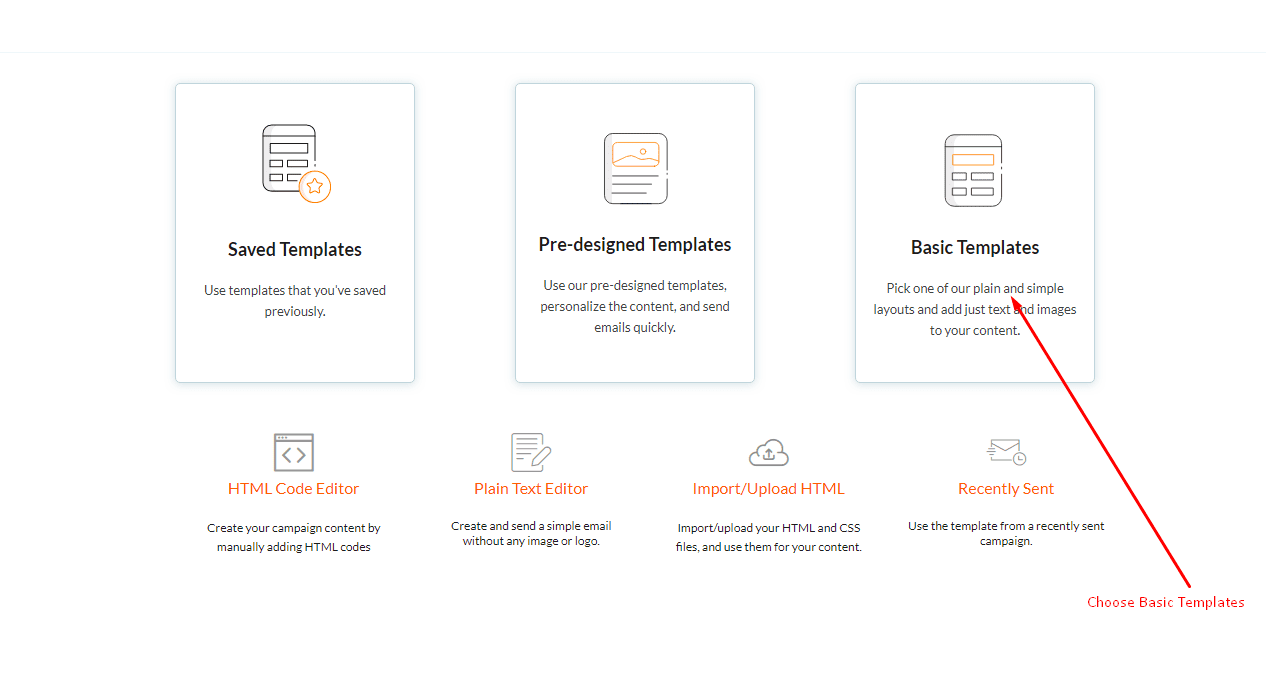
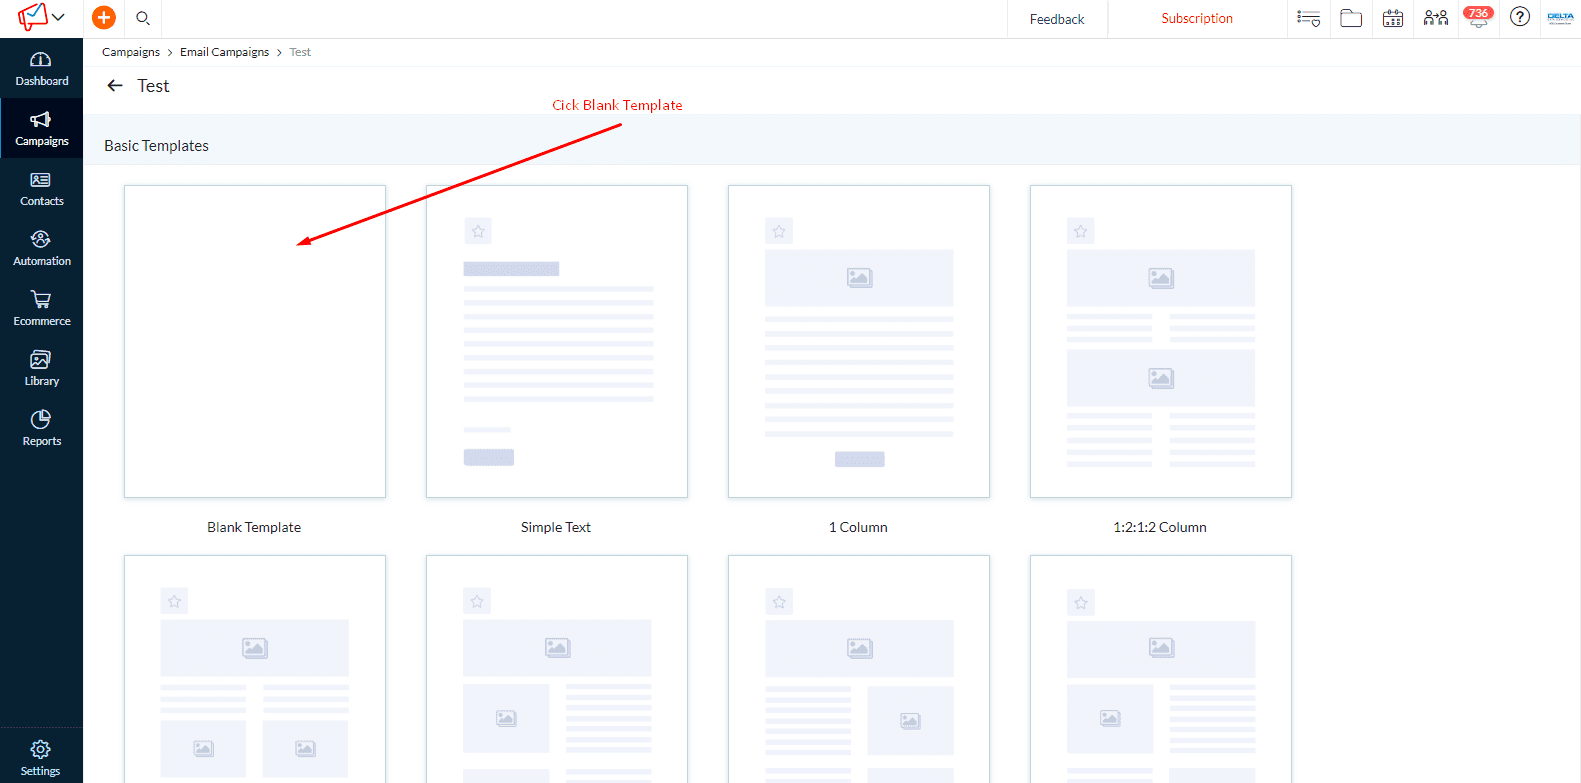
Choose Basic Templates.

Click Blank Template.

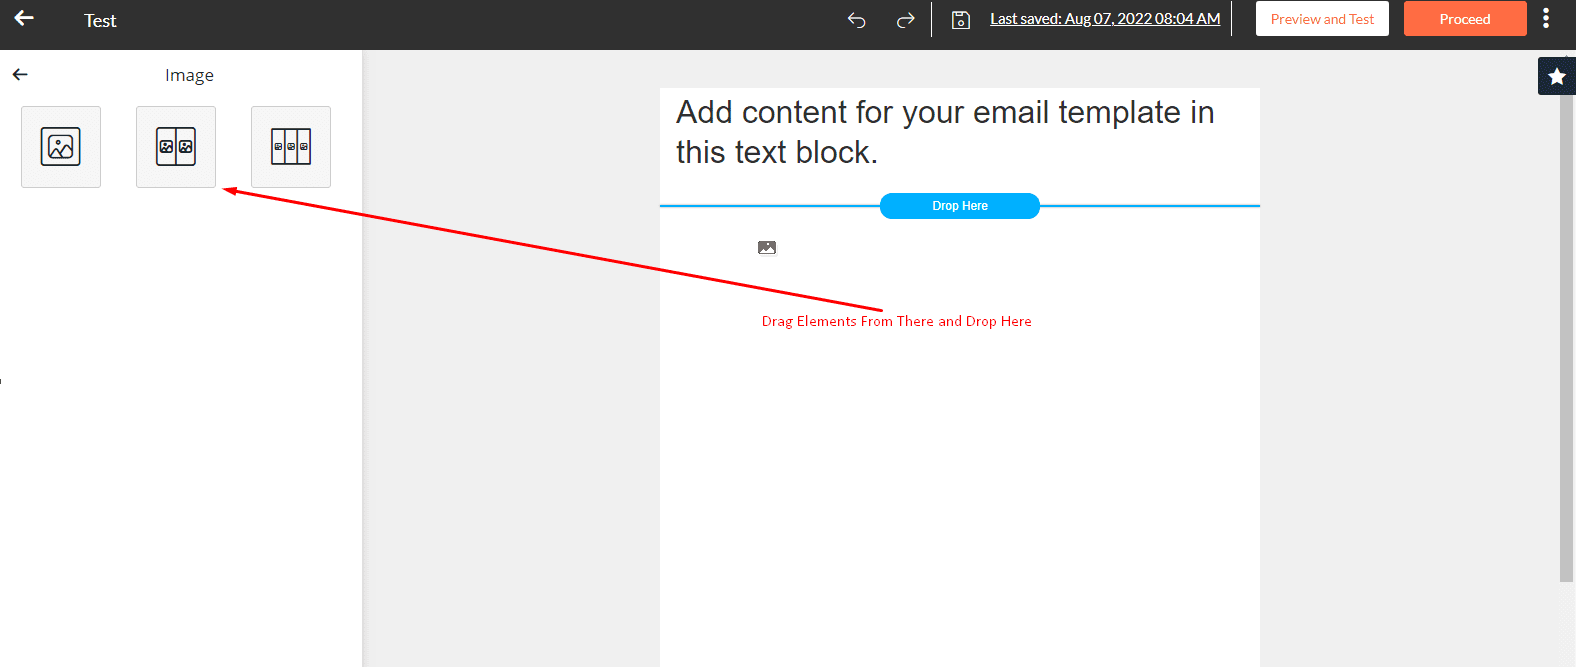
Drag and Drop Elements from Left into the Email.

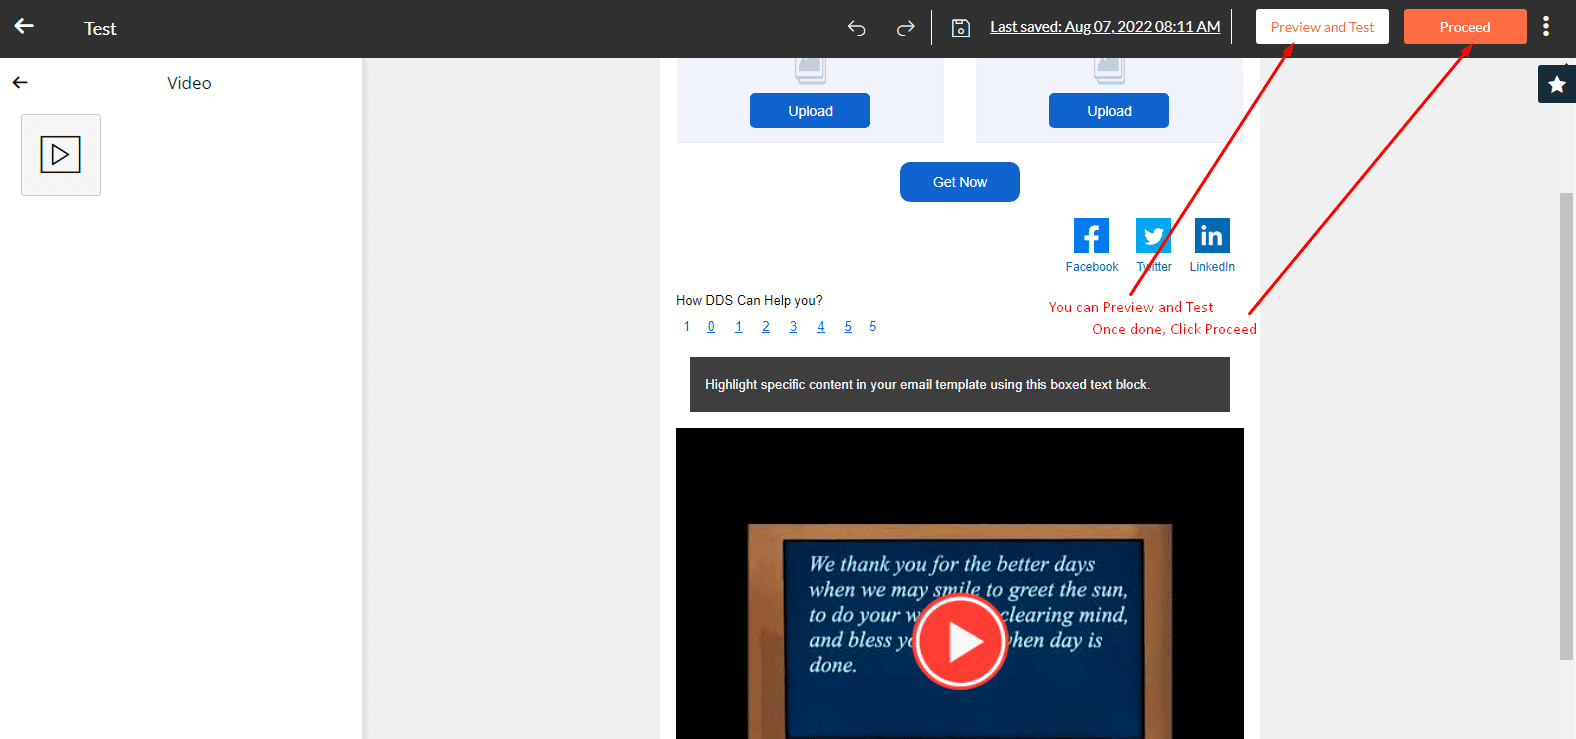
Click Preview and Test to Test the Email. Once Done, Click Proceed.

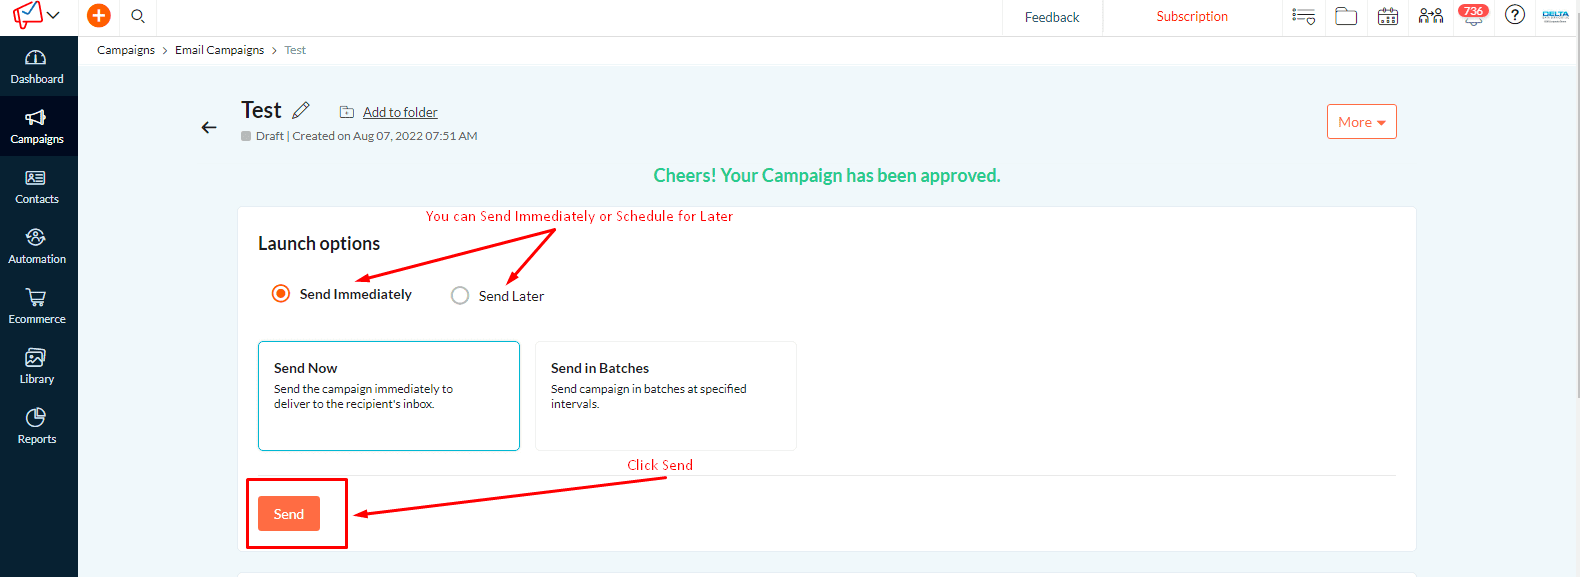
You can Send immediately or Schedule for later.

For more Zoho Campaigns Tips, stay tuned to our Zoho One Tips. 

Contact Us For Zoho Campaigns

Schedule a Free 1-hour Session

Please Subscribe

Zoho CRM Tip: The Contact Tab (Part 2) – Delta Data Services LLC

Zoho CRM Tip: The Contact Tab (Part 2)

Delta Data Services LLC

12.04.21 03:58 PM Comment(s)

Zoho CRM Tip: The Contact Tab (Part 2)

This is part 2 of the Contacts Tab blog. In part 1 of the Contact Tab we walked you through the basics of Contact tab, Contact profile and how to edit the Contact. Here we will elaborate Multiple Contacts in Single Account, how to select the Account for the Contact and see Contacts as Related List in the Account Profile, 


Multiple Contacts, Single Account:

When you select the Account Name from the pick list in a Contact profile, it associates the Contact to that Account. From then on, scrolling down below the Account information will show the related list of Contacts and this will show all the non-Primary Contacts in that Account.


When you pick the Account name be sure it does not exist because typing the name in the field creates a new Account which creates a duplicate.

Choose Account:

This is what a pop-up looks like when you click the lookup on Account

Use the search functionality to narrow down the options and find the record you are searching for.

You have to click the magnifying glass for the search to run.

Contacts as Related List to Account:
This is what it looks like when you scroll down past the Account profile in the Account and see all the related Contacts. This is called a Related List. Keep scrolling and you will see other related lists like Emails, Open and Closed Activities, Products etc.


To quickly get to the Related List you want, click on the List on the left-hand side of the screen.


You can add the new Contact, by clicking the "+" sign on both locations.

For more Zoho CRM Tip, stay tuned to our blogs. We cover all the basics of Zoho CRM from the beginner level moving to the advanced level. For one-on-one Zoho help you contact us below and schedule a free session. For video tutorials visit our YouTube channel.

Contact Us For Zoho Help

Schedule a Free 1-hour Session

Please Subscribe

Zoho CRM Video Tip: Hiding and Rearrange Modules For Better Workflow Functionality – Delta Data Services LLC

Zoho CRM Video Tip: Hiding and Rearrange Modules For Better Workflow Functionality

Delta Data Services

11.20.18 05:52 PM Comment(s)

Zoho CRM Video Tip: Hiding and Rearrange Modules For Better Workflow Functionality

You can watch our series of Zoho CRM tip videos on our YouTube Chanel.  This video covers a method where you learn how and why to hide and rearrange modules. Check it down below and don’t forget to subscribe!

Schedule a Free 1-hour session with Zoho CRM Modules and Workflows

Please Subscribe

Zoho One Tip: Zoho Forms Integration with Zoho CRM

Zoho One Tip: Zoho Forms Integration with Zoho CRM

Delta Data Services LLC

06.20.22 09:03 AM Comment(s)

Zoho One Tip: Zoho Forms Integration with Zoho CRM

If you are looking to automate the process of adding data to your Zoho CRM modules, you can use the Zoho Forms – Zoho CRM integration. With this integration, you can map the form entries directly into Zoho CRM modules. 

By integrating Zoho Forms with Zoho CRM, you can do the following:

  • Pre-fill your form with data from Zoho CRM.
  • Form submission data is mapped into Zoho CRM.
  • Data is sent between Zoho Forms and Zoho CRM via a two-way sync.

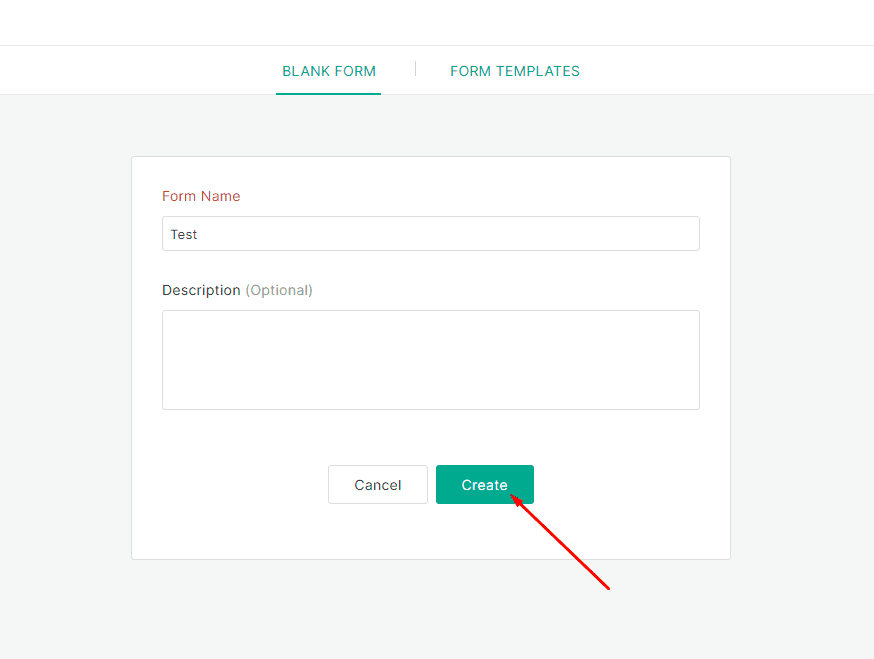
Step 1 – Create a form

Using Zoho Forms you can create a new form from scratch or choose from the available templates.
Go to:  and start building your form.

See also: Introduction to Zoho Forms.

Step 2 – Fill the form

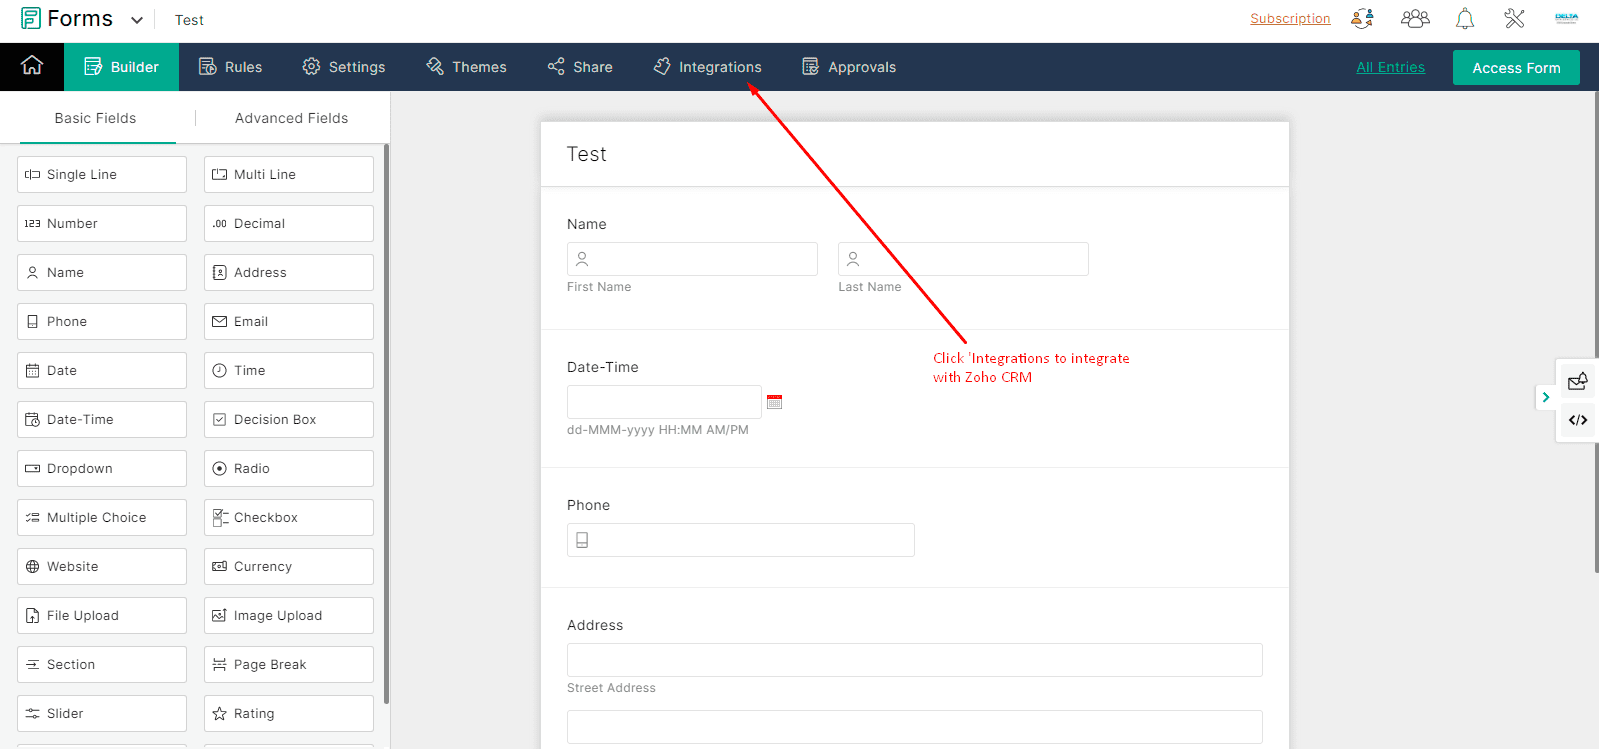
Drag and drop fields into the form.

Step 3 – Move to Integrations Page

Once the form is ready with the required fields, click ‘Integrations’ at the top.

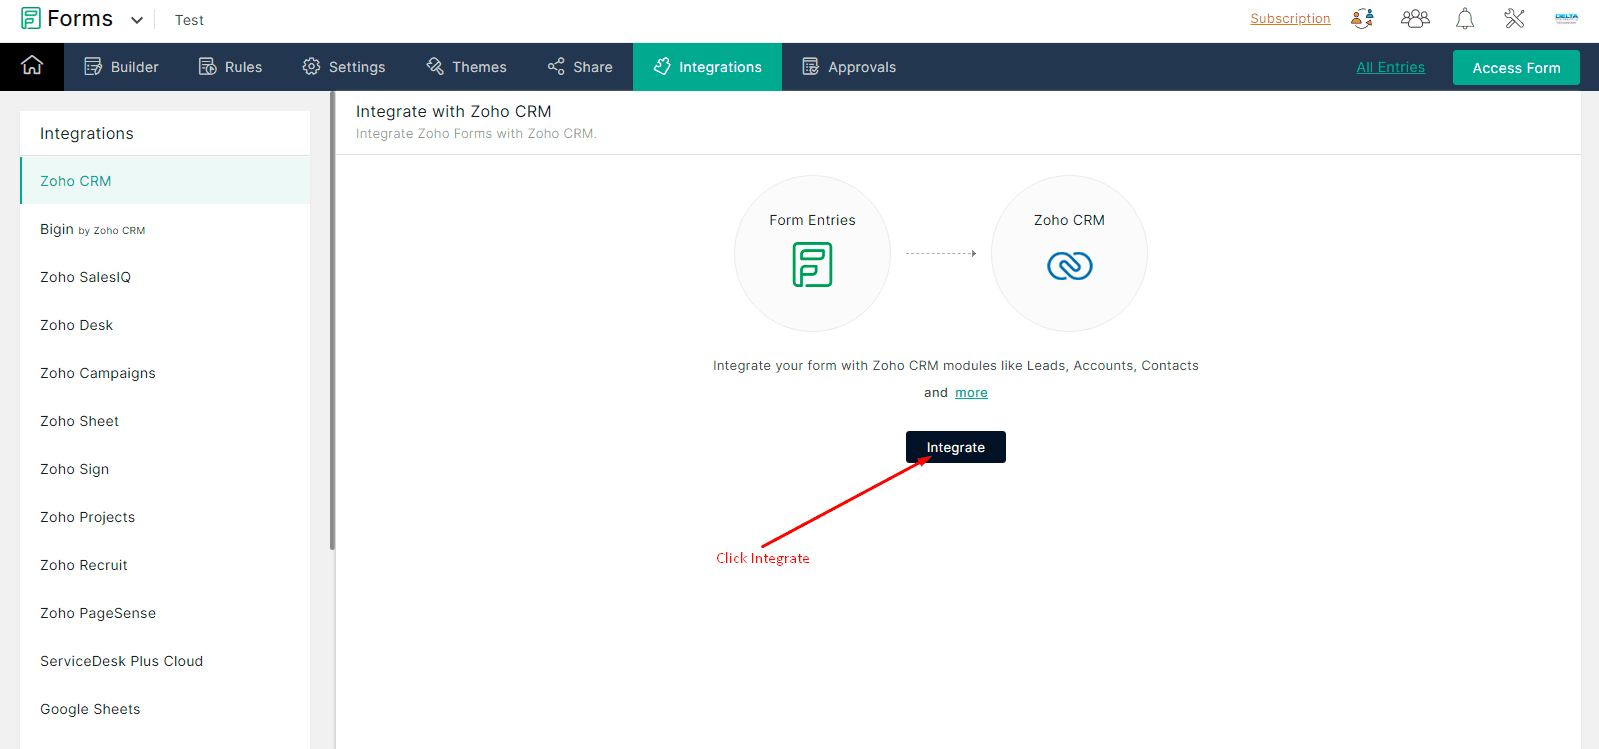
Step 4 – Click Integrate

Now click on the button, "Integrate’ to integrate Zoho Form Entries to Zoho CRM. 

Step 5 – Check the Organization

If you have multiple Zoho CRM Organization, then you can select from the drop down menu.

Step 6 – Do Field Mapping

Select the Module you would like to map the fields in. 

Then map the fields from Zoho CRM to Zoho Forms.

Add more Fields with + sign.

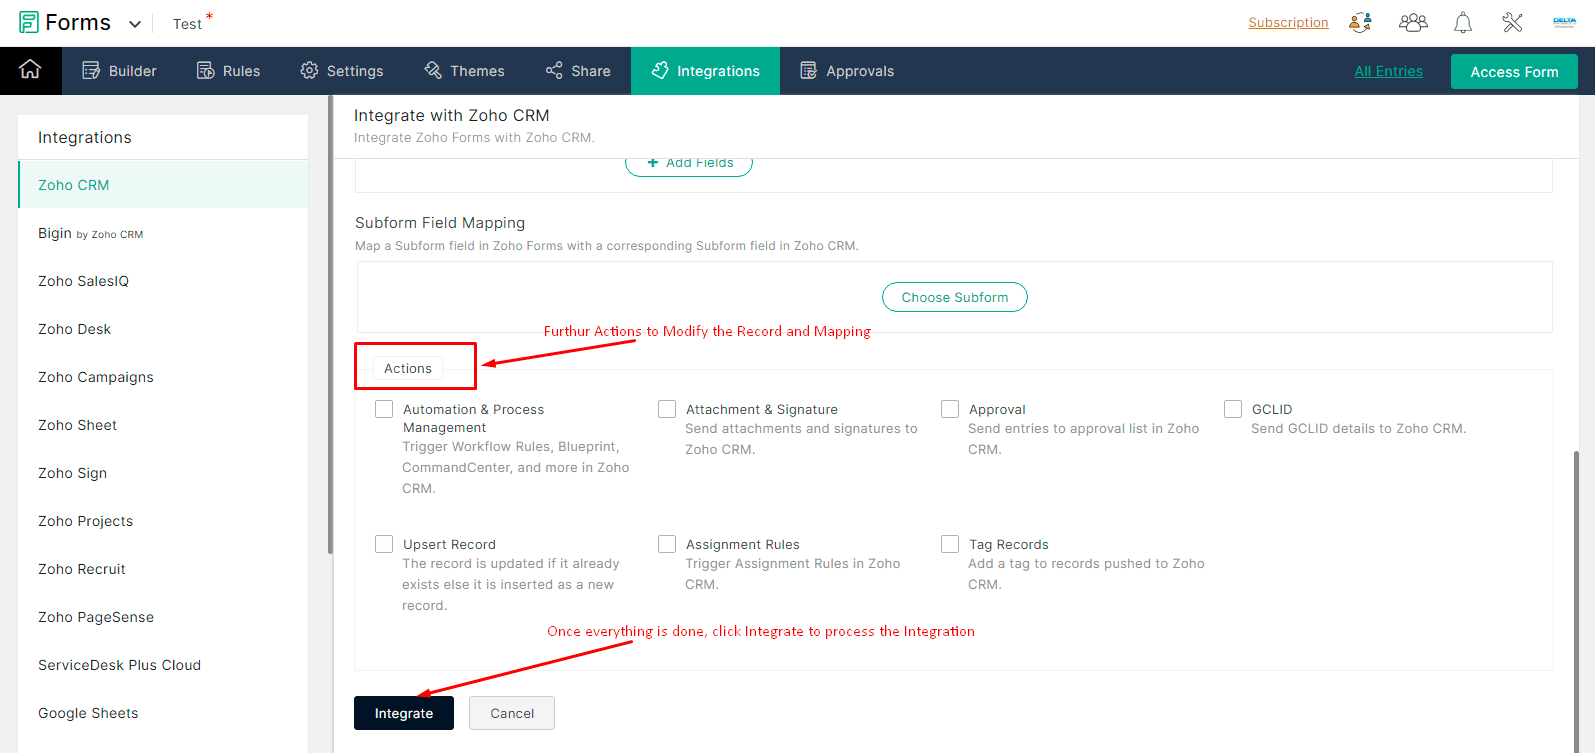
    Step 7 – Click Integrate

    Scroll down to find more options for integration. In the Actions section, you will find, advanced integration like Upsert Record, Tag Record and Approval. Choose the required option (if any) and click ‘Integrate’ button at the bottom to complete the Integration. 

    Now the Zoho Form is integrated with Zoho CRM.

    For more Zoho One Tip, keep checking our resources and blogs. DDS is a pioneer in Zoho One Tips, contact us now for immediate Zoho Help.

    Contact Us Now for Immediate Zoho Help!

    Schedule a Free 1-hour Session

    Please Subscribe

    Zoho CRM Tip: The Contacts Tab (Part 1) – Delta Data Services LLC

    Zoho CRM Tip: The Contacts Tab (Part 1)

    Delta Data Services LLC

    12.04.21 03:59 PM Comment(s)

    Zoho CRM Tip: The Contacts Tab (Part 1)

    Contacts are different from Leads because Contacts are qualified. One qualifies a Contact because you have developed a relationship with them such as having a meeting them or you are ready to send them an estimate or an invoice; Estimates and Invoices cannot be sent to Leads. In Business-to-Consumer (B2C) scenarios, the Contact the person you would bill, whereas in Business-to-Business (B2B) you would create an Account for the entity and the Contacts would be the people in the entity. This means that a single Account can have multiple Contacts. The next section will cover how to deal with this.

    The Contacts Tab:
    The Contacts tab is very similar to the other tabs in functionality. 
     

    The main functional difference between the Contact and Account is that you can email a Contact, but you cannot email an Account.

    The Contact profile:

    Contract profile has call to action buttons in the top right corner. Here you can call and bsend an email to the contact.

    When you click on "Send Email", an email pop-up will appear like below. Here you will add Subject and email body text. You can also choose from the saved templates. 

    Editing a Contact:

    Here is what the Contact profile looks like in edit mode. Required fields are sidelined in red.

    The most important function of the contacts module in Zoho CRM is that they can be used for both customers’ acquisitions as well as procurement of products from the vendors. Contacts can be related to an account as well as vendors according to your business process.

    In this blog, we guided your through the basics of Contacts Tab of Zoho CRM, for more on Contacts Tabs, go through Zoho CRM Tip: The Contacts Tab (Part 2). Feel free to contact us for Zoho Help and schedule a free 1 hour session for better Zoho understanding.

    Contact Us for Zoho Help

    Schedule a Free 1-hour Session

    Please Subscribe

    Zoho CRM Tip: Creating Activities (Tasks, Events and Calls) from the Contacts Tab  – Delta Data Services LLC

    Zoho CRM Tip: Creating Activities (Tasks, Events and Calls) from the Contacts Tab 

    Delta Data Services LLC

    09.11.21 12:34 PM Comment(s)

    Zoho CRM Tip: Creating Activities (Tasks, Events and Calls) from the Contacts Tab 

    The fastest way to create an Activity is from the Quick Links in any tab. It is always best to make related records from within the related record, as this will populate the related record with the related record information for you. Your supervisors want you use all three of the types of Activities and associate them to Leads, Potentials, Contacts and Accounts.


    There are three types of Activities:

      Events – have a start and end time. They are for

             ⊛ Appointments – physical meeting somewhere, dinner, demonstration

      Calls – These note the time of the call. They are for

        ⊛ Outbound calls

        ⊛ Inbound calls

      Tasks – have a due date and status. These are for:

        Creating a reminder to set an event. Tasks turn into Events.


    Use all three Activity types according to the directions shown below.

            ⊛Create a new Task, Event or Call with the Related List action ‘+ New Task/Event/Call’


      Create a Task: 


       This is what a task looks like in edit mode.

    It is best to make the Tasks, Events and Calls from within the Lead, Potential, Contact or Account and not from the Activities module because when you make the Activities from the module you want it related to, CRM auto populates fields like the Lead, Contact and Account Names for you and you do not have to search for them.


    Ensure to enter good notes on your Activities. If you cannot save, ensure all required fields, including Description, are filled in.


    This is what the Task profile looks like:

    As shown above, click on the subject for a dropdown menu to choose from. See the dropdown menu below.

    The Contact and Account are auto populated by creating the Call from the Account module.

    Create an Event/Meeting:

    This is what an Event looks like in edit mode. You have to ‘Add more details’ to see the Description and Account are populated.

    You can add Participants to the Meeting/Events and they will be sent an invitation to add the Event to their calendar. Contact and Account are auto populated if you create the Event from inside the Contact.

    Creating a Call:

    This is what a Call looks like in Edit mode. You can note that the Account and Contact are auto populated if you create the Event from inside the Contact.

    Scroll down to see the Call Purpose and Call Agenda

    For more Zoho Tips, stay tuned to our blog updates and learn Zoho in depth. These Zoho tips will walk you through different features of Zoho and will help you get the best business management  and sales process experience. In the meantime, contact us for your Zoho CRM customization support by clicking the button below! 

    Get Zoho CRM Tab Support Now

    Schedule a Free 1-hour Session

    Please Subscribe

    Zoho CRM Tip: How Bad Data Negatively Affects Your Business

    Zoho CRM Tip: How Bad Data Negatively Affects Your Business

    Delta Data Services LLC

    09.20.22 10:05 AM Comment(s)

    Zoho CRM Tip: How Bad Data Negatively Affects Your Business

    The term "bad data" may appear ambiguous at first, as organizations are frequently advised to avoid using bad data but do not necessarily know what it is. This inaccuracy does not always suggest that the data is untrue; truthful data might also be inaccurate. Data that is lacking crucial aspects, data that is irrelevant to the reasons for which it is to be used, data that is duplicated, data that is poorly assembled, and so on are examples of bad data. A company’s use of faulty data may have a substantial impact on its success and, in some situations, be disastrous. 

    It’s difficult to fathom how your contact lists became so awful. Years of bad data management (or no data management at all) have most certainly resulted in a disorganized mass of data. Let’s go through how it got this way in the first place.

    What is bad data in Zoho CRM?
    – Invalid or undeliverable emails
    – temporary or disposable addresses
    – outdated data
    – duplicate data
    – role-based emails

    There is, nevertheless, a ray of light. After all, you can wipe your data. And it doesn’t have to be a difficult task.

    • Identify the main sources of bad data 
    • Perform an audit
    • Stop collection of bad data
    • Cleanse your data
    • Integrate your CRM with other systems

    Let’s be real. Your expanding database is most likely a shambles. Worse, I’m sure most of it is useless. You can’t blame technology for not working correctly if you’re not providing it with clean data to operate with. This is not something to postpone; it is a data emergency! The takeaway is it will be troublesome if you do not resolve this data emergency as soon as possible. The longer you put off improving your data management, the worse it will getContact us today!

    Contact Us for Bad Data Management

    Schedule a Free 1-hour Session

    Please Subscribe

    Zoho One Tip: Internal Zoho Forms to CRM Lookup – Delta Data Services LLC

    Zoho One Tip: Internal Zoho Forms to CRM Lookup

    Delta Data Services

    02.13.21 08:46 PM Comment(s)

    Zoho One Tip: Internal Zoho Forms to CRM Lookup

    Sometimes you have a form with labels that need to be very long or you want more sophisticated formatting for the form than you can achieve in CRM, then you should consider a Zoho Forms to CRM lookup. Please note, to be able to look up a record CRM from Forms, then the form needs to be used for internal purposes only. This means you will access the form with the internal link. Once you try to use the public link for the form, then the CRM lookup in Forms will become inactive.


    Here are some examples of where the internal forms lookup can be useful:

    • A member management system where members will login using a company computer
    • An onboarding checklist where the items in the checklist are long, wordy descriptions that cannot fit into the size of a CRM custom field
    • A delivery confirmation form where the delivery agent us using a company mobile device to collect signatures of the receipt of the delivery

    The key to this or any Forms to CRM (or other) integration is that the fields in Form and CRM must both exist for the data to flow from one application to the other. So the first step in this process is to create the fields you need in Forms and in CRM.

    The next important key, is that, both matched fields in CRM and Forms must be in the same field type. So a drop down field in Forms matches with a pick list in CRM. Likewise, a number field in CRM matches with a number field in Forms. Likewise, Forms decision box goes with CRM checkbox.  If the field type does not match, you will not be able to transfer data between the fields and therefore the systems. If you find that you are mapping your fields and the field you need doesn’t come up to be matched in Forms, check the format of the field; this may be the culprit.

    In Zoho Forms, create a CRM Lookup field. When you set up the field, you have the option to connect the fields where you want to pull the answer from CRM at this point. Later on, we will send data back to CRM. However, at this point we are drawing data from CRM. This is helpful in the member management system for example, because it shows the staff if the member who is pulled up with the lookup field is an active member or not. This is just one use case for pulling data from CRM during the lookup.

    Go to add a field from the Advanced Fields section of the Zoho Forms Builder.

    Drag the Zoho CRM lookup field into the Builder.

    Set up the Zoho CRM lookup field.

    The next step is to integrate the data received in the form back to the CRM. After the form is filled in, the CRM record will be updated. To do this you will need to go to the ‘Integrations’ tab in Zoho Forms.


    Please take note of the Upsert functionality shown at the bottom right of the figure. We’ll talk more about this functionality later.

    In order to publish your form so it can be used, you want to use a private link for the Zoho CRM lookup field to work. Embed this link in a button on your website or send via email so it can be accessed on the computer or mobile device where you need it. To get this private link follow the instructions below.

    All forms also have a public link, however, the Zoho CRM will not work on the public link. The Zoho CRM lookup is for internal purposes only. Only users with a Zoho Forms account such as through their Zoho One account will be able to access this private form. See the public link that won’t work for this use case below.


    The best way to update records in CRM using the public link is to use the Upsert record functionality. So long as the public person filling in the forms enters the same email address that you have in the CRM, then the person’s record will get updated with form data using the Upsert record functionality shown two figures above.

    Here’s an example of how the form can look on your website.

    Clicking the Check In button in this use case results in the private form being loaded as in the figure below.

    When a record is pulled up from the CRM, the form loads as in the following figure.

    Enjoy your new Zoho One, Forms and CRM integration for internal purposes and let us know if we can  help with your questions by clicking below.

    Get Started Now with Zoho CRM and Forms

    Schedule an Appointment to discuss Forms and CRM

    Zoho CRM Video Tip: Set Up Email Templates (Part 3) – Delta Data Services LLC

    Zoho CRM Video Tip: Set Up Email Templates (Part 3)

    Delta Data Services

    09.09.20 11:13 PM Comment(s)

    Zoho CRM Video Tip: Set Up Email Templates (Part 3)

    In the previous Email Templates Part 1 and Part 2, we have shown you all of the features of the Email Templates in Zoho CRM. Since you have understood everything about the Drag-and-Drop Technology tool and Elements, you will be able to know how to make your own email templates.


    In this Zoho CRM Video Tip – Set Up Email Templates Part 3, we will show you how to use your email templates, how to insert, and how to send them to your Leads and Contacts. The topics include:


    • Individual Emails
    • Bulk Emails
    • SalesInbox
    • Email Notifications
    • Workflow Alerts

    Tip: this is part 3 of Zoho CRM Video Tip: Working with Email Templates video blog series.


    Click here to go the Zoho CRM Video Tip: Working with Email Templates (Part 1)

    Click here to go the Zoho CRM Video Tip: Working with Email Templates (Part 2)

    Learn more about Email Templates (Part 3)

    Schedule a Free 1-hour session for help with Zoho CRM Email Templates

    Please Subscribe